Opening Note: Don’t forget to check out the bottom of the post for a GIVEAWAY!
If you’re an organized bride, you know how important true organization is! It’s one thing to have your vendors “organized” (aka just booked) and something completely different to have every wedding detail in its proper place. And even better, have them in such a way that in case of an emergency, someone else can step up and know where to find everything. This means current contact lists, well organized information (in binders, folders, etc.), and easily accessible wedding day items.
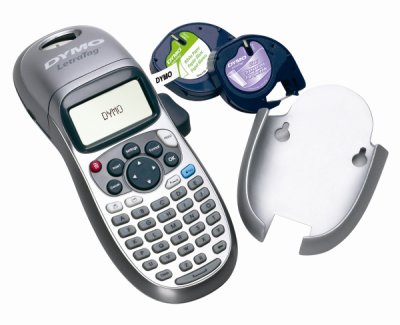
That’s where the DYMO Personal Lablemaker comes in. Not only does it fit perfectly and comfortably in the palm of your hand, but it has a 13 character display, a color-coded keyboard, 5 font styles, 7 print styles, 8 boarder styles, 195 symbols, and the capability to print on two lines. Phew! In addition, what you see on the screen is exactly what the label maker prints out!
I’m not one for reading too deep into directions. So of course as soon as I got mine, I cut open the package and got to labeling. I figured I would have to do some sort of setup or programming process before I could begin using the machine, but all I had to do was press “On”! So naturally, it was love at first button.
Check out this bad boy!

Yeah. It makes my heart beat a little faster.
DYMO has teamed up with the Clutter Queen for some helpful wedding planning/organizational tips. Here they are, from the Queen herself:
1. Make a detailed shopping list of all of the organizational supplies and tools you’ll need to plan your wedding. You’ll need things like file folders, a three-ring binder, albums and boxes for cards and photos, and a DYMO® Personal Labelmaker – these will help keep you and your fiancé organized while planning the big day.
2. Create a binder with sections labeled for calendar, dress ideas, guest list, registry, shopping lists, showers and parties, thank you cards, gift lists, bridal party schedules, and so on. Take the binder with you on appointments and meetings. Everything will be in one place for easy reference.
3. To help keep track of the landslide of wedding gifts you receive, use file folders and label them by category – gift cards and certificates, receipts, returns, etc. Also, consider labeling the outside of the box a gift comes in with who gave it to you. This will help when writing thank you notes later.
4. Designate a table in a low-traffic area of your home for crafting wedding favors, invitations, note cards, etc. Use a DYMO® Personal Labelmaker to clearly label boxes for RSVPs, cards, ribbons, table-setting cards and more.
5. Instead of letting wedding cards and photos pile up, store them in an album or photo box. Be sure to label the backs of cards and photos with names, dates, and location for quick and easy reference.
6. Make multiple copies of photos and other special memorabilia to create one-of-a-kind “brag books” for your mom, grandma, and soon to be step-mom to show-off to their friends later.
7. If there is something you need only for the wedding, consider borrowing from a friend or relative. A family heirloom – like your grandmother’s cake knife or your mother’s cake topper – will not only add sentimental value to your wedding but save you shopping time and money.
8. If you plan to provide a special CD for the DJ to use during the reception, clearly label the disc case with the song name and track number using a product like the DYMO® Personal Labelmaker. For a more personalized disc, use the DYMO® DiscPainter™ CD/DVD printer, which will print text and photos directly onto the disc. This way there aren’t any slip-ups during your special dance.
So, now that your mouth is watering and your organizational gears are turning, don’t you just want to get your hands on one? HERE IS YOUR CHANCE! We are giving one away! All you have to do is leave a comment and we’ll randomly pick a winner at the end of the week. We’ll send you an email asking for your mailing address and you’ll get the labelmaker sent right to your doorstep. So get to commenting! =)